Table of Contents
Matrix
Blocks
Write a text on the matrix
Replace Hello Kniwwelino with any text or number you want to display on the matrix. This text will then scroll over the matrix.
Options:
repeating: the text will repeat until a new command is made for the matrix.once: the text will be shown only once. If a new command is made for the matrix, the display if the text is interrupted.once and wait: the text will be shown once and the matrix is forced to wait before executing a next command.
Clear the matrix
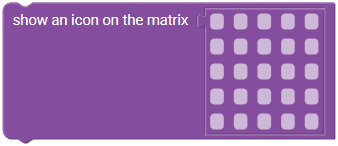
Show an icon on the matrix
With this block you can define an image to be shown on the matrix. Each of the squares corresponds to one of the LEDs of the matrix. Click on the square to color it in red and through this, switch it on. If you click again, the LED switches off again.
Predefined icon
This block represents a predefined icon. Choose one of the list and use the block show an icon on the matrix to display it.
Custom icon
This block represents an icon. Each of the squares corresponds to one of the LEDs of the matrix. Click on the square to color it in red and through this, switch it on. If you click again, the LED switches off again.
Draw a pixel on the matrix
With this block you switch an individual pixel of the matrix on or off.
Options:
X: The position of the colunm with0= left and4= rightY: The position of the row with0= top and4= bottomLED state:0= off and1= on
Read a pixel on the matrix
With this block you can read the current state of a LED of the matrix. Returns 1 if the LED is currently on, and 2 if it is off.
Options:
X: The position of the column with0= left and4= rightY: The position of the row with0= top and4= bottom
Set matrix brightness
This block allows you to set the brightness of all the LEDs of the matrix. The value must be in between 1 (dark) and 15 (bright). Default value is 10.
Set matrix blinkrate
With this block you can make the matrix blink. After using it, all next assignments on the matrix will blink.
Options:
on: activated matrix LEDs are continuously on. This is the default value.1/2 Hz: activated matrix LEDs will blink with a frequency of 1/2 Hz, i.e. once every 2 seconds.1 Hz: activated matrix LEDs will blink with a frequency of 1 Hz, i.e. once per second.2 Hz: activated matrix LEDs will blink with a frequency of 2 Hz, i.e. twice per second.
Example
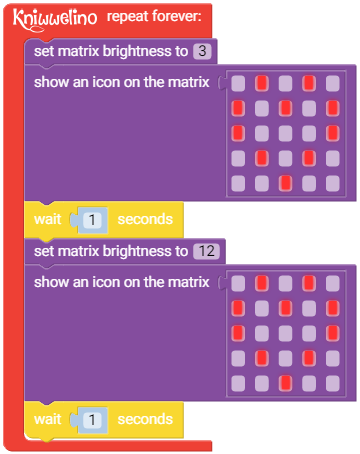
The following image shows an example for programming the matrix: a heart blinking in two different brightnesses.
You can make such an animation by defining a sequence of images. For each image you can change the brightness. Use the block wait X seconds / milliseconds after each image block. This will define how long the image shall be shown on the matrix before the next assignment on the matrix.


