Adding extensions to the Kniwwelino
You can add additional components, such as sensors, LEDs, motors, buttons to the Kniwwelino by making use of the pins on the outer area, or the i2c connector. There are different types of pins, each having a different role in the connection to the Kniwwelino.

Each component need to be connected to two or more of these pins, depending on the technical specification of the component. In the following we show you how standard components are connected to the Kniwwelino.
The connection itself can be done in various ways. In the section Connecting extensions you can read 2 ways of connecting them without soldering.
External LED
To switch on a light: you can give a feedback (for instance that you got a message) or just for decoration.
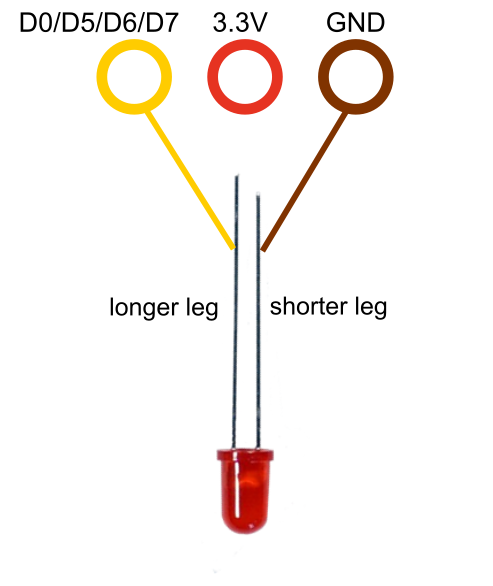
To connect an LED:
- shorter leg goes to GND
- longer leg goes to pin D0, D5, D6 or D7
To program external LED, you can use the following block: set external LED
You can also find step-by-step instructions for connecting LEDs here: Adding external LEDs
External push button
To trigger an event: you can press the button or click it (press and release). In this case the circuit is closed.
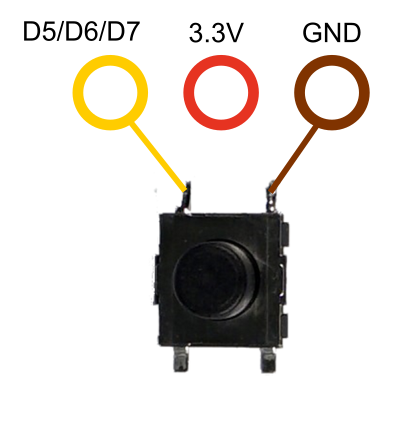
To connect a button:
- One leg goes to D5, D6 or D7
- The leg aside to it goes to GND
You can also find step-by-step instructions for connecting buttons here: Adding external buttons
Buzzer
The buzzer allows you to play a musical note or a tone.
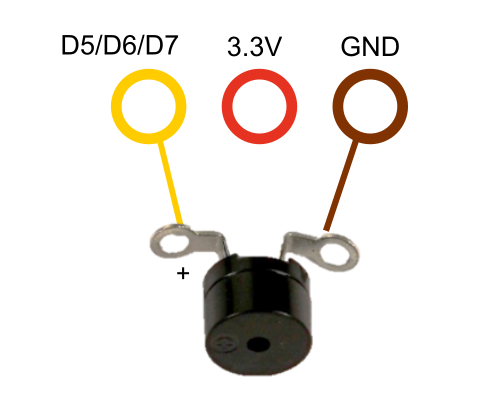
To connect a buzzer:
- The leg labeled + goes to D5, D6 or D7
- The other leg goes to GND
Servo motor SG90
A servo is a motor able to turn to a predefined position. This position is an angle between 0° and 180°. It allows you, for instance, to build a mechanical arm.
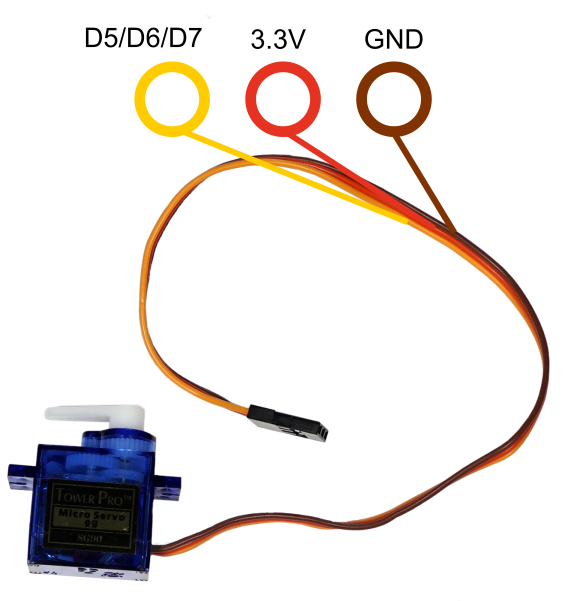
To connect a servo motor:
- Yellow cable goes to D5, D6 or D7
- Red cable goes to 3.3V
- Black cable goes to GND
You can find step-by-step instructions on how to connect a servo motor here: Adding a servo
Neopixel LED strip
Switch on the LEDs and change their colour and effect to give a feedback or for decoration.
To connect an LED strip:
- DI goes to pin D5, D6 or D7
- +5V goes to 3.3V
- GND goes to GND
![]()
You can find detailed instructions for connecting an Neopixel RGB LED strip here: Adding external Neopixel (WS2812) LEDs
Proximity sensor
You can find detailed instructions for connecting a proximity sensor here: Adding external Sensors
Potentiometer
You can find detailed instructions for connecting a potentiometer here: Adding external Analog Sensors
i2C sensors

You can find detailed instructions for connecting i2c sensors here: Adding external I2C Sensors
Connecting extensions
To connect your extensions (except for i2C sensors) you can either use alligator clips or silicon wire. Make sure to connect the right leg with the right pin as indicated in the diagrams above.
Important! Before connecting any extensions, make sure to cut the power supply for the Kniwwelino.
Connecting with alligator clips
For each connection:
- Take an alligator clip and connect one end to the leg of the component (as indicated in the diagrams above).
- Connect the other end to the pin on the Kniwwelino (as indicated in the diagrams above).

Connecting with silicon wire
For each connection:
- Cut a piece of the silicon wire each (using scissors). The length depends on the project you want to use it for.
- Take off a part of the silicon protection at both ends (about 1 to 1.5cm). You can simply tear it off with your finger nail.
- Wind one end of the wire around the leg of the extension (as indicated in the diagrams above) and fix the connection with tape.

- Wind the other end of the wire around the pins on the Kniwwelino (as indicated in the diagrams above).
